
How to export and share animations in FlipaClip

FlipaClip, the 2D animation app, allows you to bring your ideas to life in a simple and effective way. From initial sketches to complex animations, FlipaClip offers a wide range of tools that make the animation process accessible to beginners and professionals alike.
However, once your animation is complete, you might find it challenging to know how to export and share your work effectively.
This detailed tutorial will guide you through the process of exporting your projects in different formats and show you how to share your animations on social media. You will learn how to select the appropriate resolution and format, save the animation to your device, and distribute it on social platforms.
Selecting the Appropriate Resolution and Format
When it comes to exporting animations, choosing the correct resolution and format is crucial to ensure that your artwork appears just as you expect on any device or platform.
FlipaClip offers several export formats, including MP4 and GIF, each with its own advantages.
Available Formats: MP4 and GIF
The MP4 format is ideal for animations that need to include sound and is compatible with most social media platforms and devices. This format is generally the most recommended for sharing animations on sites such as YouTube, Facebook, or Instagram, where video quality is important and audio support is necessary.
On the other hand, the GIF format is perfect for shorter animations that do not require audio and that you wish to share on platforms that support moving images, such as Twitter or certain online forums. GIFs are easier to share due to their reduced size, but they do not offer the same visual quality as an MP4 file.
Selecting Resolution
FlipaClip allows users to choose the resolution of their animation during export. The resolution options usually range from 480p to 1080p or even 4K, depending on the project's needs and the device's capabilities. For most social media platforms, a resolution of 1080p is sufficient, as it offers clear and detailed image quality without being too demanding in terms of file size.
When choosing a resolution, consider where you plan to share your animation. For platforms that support high definition, such as YouTube or Vimeo, opting for a higher resolution will ensure your animation looks professional.
However, if you are exporting a GIF to share on Twitter, a lower resolution might be more suitable and will result in a smaller, more manageable file.
How to Save the Animation on Your Device
Once you have decided on the resolution and format, the next step is to save your animation to your device.
This process is simple in FlipaClip, but it is important to ensure that all settings are correct before proceeding with the export.
Steps to Export the Animation
- Open the animation project you wish to export in FlipaClip.
- Tap the menu icon in the top right corner of the screen to access the export options.
- Select the option to Export Video or Export GIF depending on the format you desire.
- Set the desired resolution using the provided options.
- Review the settings and tap the Export button to start the saving process.
The time it takes to export the animation will depend on the length of the project and the chosen resolution. Once completed, your animation will be available in the designated gallery or folder on your device.
It is important to verify the exported file to ensure that the quality and details are as expected before sharing it.
Tips for Successful Exporting
To ensure a successful export, make sure your device has enough storage space available. High-resolution animations can take up a significant amount of space, and a lack of storage may result in errors during the export process.
Also, ensure that the latest version of FlipaClip is installed, as updates often improve performance and fix bugs that could affect the export.
If you encounter issues while exporting your animation, try restarting the app or the device to resolve possible temporary glitches. You can also look for additional software updates that may improve compatibility and overall performance.
Sharing your animations on social media is an excellent way to showcase your work and gain recognition for your skills. FlipaClip makes this process easy by offering multiple options to share directly from the app or through your device’s gallery.
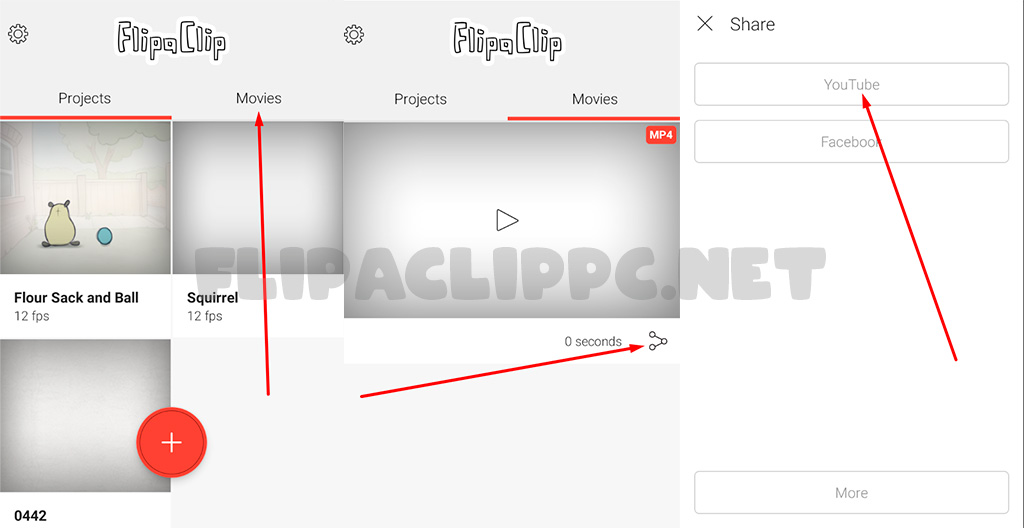
FlipaClip includes built-in features that allow you to share your animations directly on various social media platforms. After exporting your animation, follow these steps to share it:
- Access the export gallery within FlipaClip and select the animation you wish to share.
- Tap the share icon, which will provide you with options for different platforms, including YouTube, Instagram, and Facebook.
- Select the desired platform and log in if necessary. FlipaClip will handle the formatting and compatibility automatically.
- Add descriptions, tags, or any other necessary details before posting your animation.
Sharing from the app is quick and convenient, as FlipaClip automatically optimises the file for the selected platform, ensuring your animation looks its best.
Uploading Animations Manually
For those who prefer to upload their animations manually or need to make additional adjustments before sharing, exporting the animation to the device’s storage offers greater control. Once your animation is saved, you can use individual social media apps to upload the file.
For example, to share a video on Instagram, open the app and select the option to upload from the gallery. From there, you can edit, trim, and apply filters before posting. Similarly, for YouTube, open the app or website and use the upload video option to select your animation from the device’s storage.
When sharing your animations, it is important to consider the specific requirements of each platform. Some social networks may have restrictions regarding duration, size, or file format, so it is always advisable to review these specifications before uploading your content.
Additionally, use relevant tags and engaging descriptions to maximise the reach of your animation and attract a wider audience. Interacting with the community and responding to comments can also increase the visibility and impact of your work.
Optimising the Animation for Different Platforms
Optimising your animations for different platforms can significantly enhance viewing quality and user engagement.
By understanding how each platform processes and presents content, you can adjust your work for the best results.
Optimisation for YouTube
For YouTube, consider exporting your animations in high resolution (at least 1080p) to ensure the video quality is the best possible. YouTube supports sound, so take advantage of this feature by including music or sound effects that complement your animation.
Use custom thumbnails and detailed descriptions to make your content more attractive and easier to find. Playlists and tags are also helpful for organising and promoting your work on the platform.
Optimisation for Instagram
On Instagram, square (1:1) or vertical (9:16) videos tend to perform better, as they fit how users typically hold their mobile devices. Ensure your animations are visually appealing from the first second, as Instagram automatically plays videos when scrolling through the feed.
Consider using IGTV for longer animations or splitting your project into smaller parts to share as stories. Instagram also allows the use of music, which can further enhance your content.
Optimisation for Twitter
Twitter is perfect for sharing short and eye-catching clips. Ensure your GIFs or videos do not exceed the recommended playback time and use relevant tags to increase visibility. Interaction on Twitter is fast-paced, so responding quickly to comments can boost engagement.
Use polls or threads to create a dialogue around your animation and encourage greater interaction with your followers.
You can also experiment with different content formats to see which generates the most interest and engagement.
Leave a Reply